Zdobienie

Homemade power banks

Zdobienie

Homemade power banks

During an astrophotography session in outdoors, smowhere in the field, especially in spring or autumn, there is dew.
A wet lens makes photography impossible, so you need to take care of the possibility of drying the lens and even better, prevent dew during the photo session.
A heater-tape powered from the USB port of the powerbank, is ideal for reducing dew on the lens and even eliminating it totally.

Mobile power bank - 12Ah - white
Mobile Power Bank with two USB fast charging ports
12 Ah

Over the years I have used a number of different, small travel powerbanks of commercial manufacture, for charging my phone or powering mentioned heater.
They all broke down after a period of two years of use except for one, which still works today. It is an exception, no longer available on the market for sale.
Each commercial powerbank broke down in almost the same way, for the same reasons. The first reason was the large amount of water accumulated on the unit (dew), led to a short circuit.
The second, more common reason for failure, was the negative temperature in which I used the powerbanks, a range of -1 to -8 C degree.

Mobile power bank - 12Ah - white
Mobile Power Bank with two USB fast charging ports
12 Ah

I struggled with trying myself to repair the defects once the manufacturer’s warranty had expired. For those units that survived I’ve sent with the warranty service, which most often returned my money instead of the repaired device. Every time I went to take a night shots of the sky, I wondered – which of the two powebanks would break down this time?
My irritation reached its peak, when both powerbanks died in the same night in use with -3C degree.
Commercial powerbanks that can work with negative temperatures, cost far too much in relation to the capacity and functionality they offer.

Mobile power bank - 12Ah - white
Mobile Power Bank with two USB fast charging ports
12 Ah

I sat down at my computer and started working on my own powerbank, that would not die during use in minus degrees. I defined my own requirements and after two months of work and after-hours digging in subject, I created a prototype that worked without much complaint. I knew that the prototype would have hidden flaws that I was not aware of. I thought, my children could be great testers of my idea. I made a copy for each of them and two pieces for myself.

Over more than a year of using all the units, design and functional flaws became apparent, which were easily corrected. During use, I came up with the idea to add a small PV panel that can charge the powerbank in outdoors under the sun light. It doesn’t give a lot of extra power, but it will always reduce a bit the power consumption from powerbank self.

Four pcs of Mobile power banks - 12Ah
Mobile Power Banks with two USB fast charging ports
12 Ah

My owne powerbanks I carried with me almost everywhere. I used them in negative temperatures range from -1C to -13C.
None of them failed. Only the capacity of the recycled power cells used decreased, which in most cases is typical, when you use used rather old power cells. Everything wears out. I only replaced the cells that were weaker and used the powerbank further.
Today I’m already using the new final version, which I’m very happy with and I’m not going to buy any more commercial powerbanks, that don’t meet my expectations.

It has only one disadvantage, it is a relatively large device compared to commercial ones of the same capacity, some how I had to pinch all the electronics, replaceable power cells and PV panel. Personally, the size doesn’t bother me. When I go outdoors to take photo shoots or for any other reason, I throw the powerbank in my backpack or bag and vayola ahead 🙂

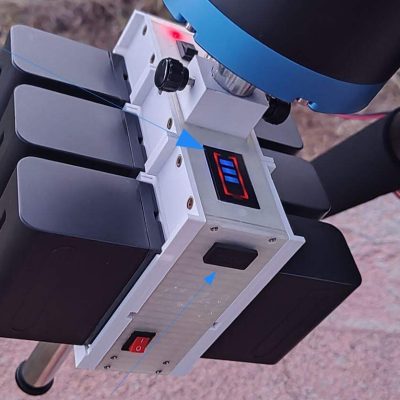
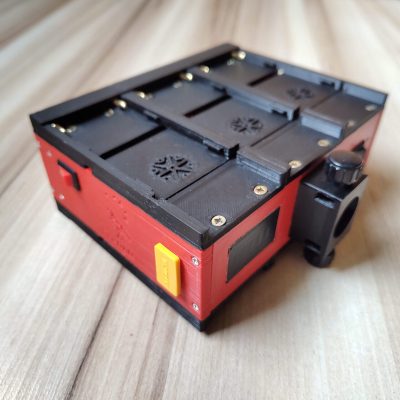
The photos show power banks that I made for my children 🙂
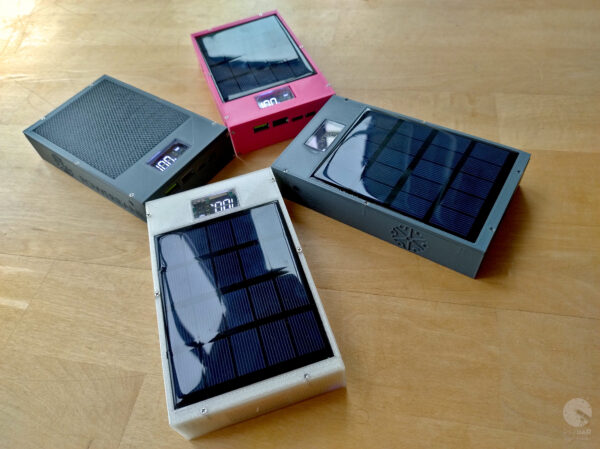
Four pcs of mobile power banks - 12Ah
Mobile Power Banks with two USB fast charging ports
12 Ah

The main functionalities and capabilities of the powerbank are:
–
replacement of used cells with new ones, without replacing the entire powerbank, definitely reduces the cost of using it,
– use of different capacities of power cells available on the market. I can increase or decrease the capacity of the powerbank, I rather prefer to increase 😉
– PV panel always helps a little in charging devices and saves energy in the powerbank itself,
– USB-A charging ports support fast charging mode,
– ability to charge the powerbank in fast charging mode via the USB-C port,
– ability to charge the powerbank in standard mode via the micro-USB port,
– % level display of available energy.

 

Support my work on Ko-fi

Did this guide help you?

I create these guides and projects as a hobby. If I helped you save time or money, consider supporting my work with a coffee. It keeps the energy flowing for future projects.

Categories
Newest articles

iOptron CEM 25P

iOptron CEM 25P RA axle bearings replacement

iOptron CEM 25P RA axle bearings replacement. Instructions for how to replace faulty RA-axis bearings (6907) in the iOptron CEM 25P mount yourself. Eliminate friction and improve tracking accuracy. Do…

Support

Was description useful? Consider to support author, it prevents to post annoying ads for you. All you just could do is once a year, sponsor for me a coffee. The currency, amount, doesn’t matter to me. Matter to me, that you want!

Read

Similar Articles

SynScan controller firmware update

SynScan controller firmware update – NEQ6Pro

WARNING – the author of this manual accepts no responsibility, for any damages that may occur as a result of following this manual. All actions described in this manual are undertaken at your own risk. SynScan controller firmware update – Introduction   Starting from version 3.0, users can independently update the firmware of SynScan controllers for NEQ mounts. Simply download the latest software version from the Sky-Watcher website and perform the update following the instructions provided here. Requirements SynScan™ Hand Control of version 3.0 or later. Windows 8.1 or later An available RS-232C communication port on the PC RS232-USB hardware converter in case of missing DB9 COM port in your laptop / PC PC link cable that comes with the SynScan™ hand control DC power supply with 12~14V/1A output. Power plug should be 2.1mm diameter, tip positive.      Preparation for update Create a directory called SynScan, preferably on your C: drive. Visit the Support Page of the Sky-Watcher website at https://www.skywatcher.com/download/software/ Download and save two files, follow with example: Windows program: SynScan Firmware Loader, Version 3.5 – click with Download button. you’ll save a file with name: synscan_verXXXXXX_firmware_release.zip where XXXXXX – is a version nr Next download Firmware: SynScan V4/V5 Hand Controller For All GO-TO Mounts, Version 4.39.21 – click on Download button you’ll save a file with name: synscanfirmwareloader_verXX.zip where XX – is version nr Connecting devices Connect the USB-COM (RS232) adapter to the computer’s USB port.   Connect the male COM plug of the adapter to the female COM plug of the SynScan controller cable.   Connect the RJ-11 plug of the controller’s COM cable to the RJ-11 port on the controller. Ensure that the plug is securely inserted—you should hear a distinct “click” as the plug snaps firmly into place in the controller’s socket.   Connect the controller to the mount using the dedicated cable – RJ45 plug to the COM port on the mount. Ensure the cable is securely connected to both the controller and the mount for proper communication during operation. We now have the following connection setup – example:   Firmware update the SynScan™ Hand Control On the controller, simultaneously press and hold the buttons “0” and “8.” Turn on the mount’s power as shown in below photo. The controller will emit a “beep” sound during startup and then display the message “SynScan Update Ver….” as shown in the image. The controller has now been set to firmware update mode. This indicates that the device is ready for the next steps in the firmware update process. On your computer, run the Computer Manager and find the COM port which will be used for update. With this example it is COM5. Check the COM port number on your system. Open Computer Management and locate the COM port. To do this on a Windows system: Press Win + X and select Computer Management from the menu. In the Computer Management window, navigate to Device Manager. Expand the section labeled Ports (COM & LPT). Here, you will see a list of available COM ports along with their assigned numbers (e.g., COM1, COM2). With this example it is COM5. Run the SynScanFirmwareLoader.exe software on your PC. Once the program is launched, you should see a window SynScan Firmware Loader , make sure the “Auto-detect COM Port” checkbox has been unchecked. Set the COM port. Click the HC Version button. The program will attempt to connect to the controller and retrieve information about the hardware version, firmware, and the celestial object database. You will see the version numbers at the bottom of the Firmware Loader as shown on below picture. If the program is unable to communicate with the controller, enable the Auto-detect COM Port option and click the HC Version button again. If the Loader program cannot detect an available COM port, check the connection between the controller and the computer. Click Browse to select the SynScanVXXXX.ssf file in the SynScan folder. It is recommended to enable the – Enforce database update – option and then click the Update button to start the update procedure. This ensures that the entire database is refreshed during the update process, reducing the risk of any errors or omissions. The update status can be monitored under the Update and HC. Version buttons. Update Complete. Click on the HC. Version button and check if the controller has reported a new Firmware version. The update was fully successful. Close the Loader program and turn off mount power suppl. Turn the mount’s power back on and check whether the controller displays the new firmware version. Check if the mount and H.C. works properly. As you can see, the firmware update process for the SynScan V4 controller is not overly complicated, but it does require careful attention. It’s crucial to follow all the steps outlined in this guide in the correct sequence, with focus and precision. I hope the description provided could be at least somewhat helpful.   It’s worth mentioning that the mount performs excellently in the field when used with the PERUN II power bank.

Read more...