Laser Collimator modification: The Button Cell Problem
Standard laser collimators (including the popular Baader Mark III) are powered by small LR44 or CR2032 button cells. These have two critical flaws in astrophotography:
Voltage Drop in Cold Weather: In freezing temperatures, their efficiency drops drastically, causing the laser to dim. A dim beam loses its definition, making it difficult to precisely judge the center of the mirror.
Short Lifespan: Batteries tend to die at the worst possible moment, and changing them in the dark risks mechanical shock to the collimator itself.
Engineering Solution: Constant Power Source
The goal of this modification is to replace the unstable chemical source with an external power supply [Describe briefly what you used: e.g., a 2x AA 1.5V battery pack or a 3V DC adapter]. This ensures constant laser spot brightness throughout the night, regardless of ambient temperature. Consistent voltage guarantees a sharp, focused beam, which is crucial for the precision of Newtonian optics alignment.
Warning:
Cable Drag Introducing a wire to a device that must remain perfectly axial involves mechanical risk. The weight or stiffness of the cable can cause slight flexure in the focuser drawtube or tilt the collimator itself within the sleeve.
The Solution: The wire must be lightweight and flexible. It is essential to support the cable (strain relief) by attaching it to the telescope tube (e.g., with Velcro) so that it exerts zero torque or pulling force on the collimator. Ignoring this physics principle will lead to false collimation readings.
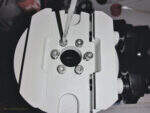
The photo below shows a socket for three pcs of the SR batteries.

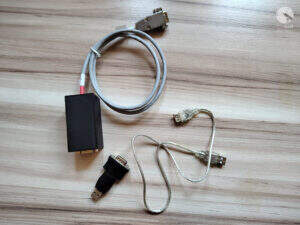
Necessary tools and items
- 1x self-designed and made battery cartridge,
- 2x screw with a cross head, dimensions of 3.85 mm fi head, 2 mm fi metric thread,
- 1x inner washer. dimension fi 2mm
- a pair of wires with a section of 0.8 mm – external dimension,
- 1x DIP switch (on/off),
- 1x 3mm red LED (1.9-2.1VDC, max: 20 mA)
- 1x 270 Ohm resistor, 250mW
- 1x self-designed and made housing for the set of 3x AAA rechargeable battery / battery,

Blender
The location of the battery in the collimator looks like a small sleeve shape. Originally there are 3 pcs batteries, model SR. I’ve measured the place and in the Blender program I designed a cartridge that will act as a connector for power supply cables and provide good wire contact.
3x rech. batt. AAA = 3,9VDC
Collimator with standard requirements to work needs:
3x SR 1,5VDC = 4,5VDC
The voltage difference is 0.6VDC it can be a lot, or not much, it depends on how you look at it. It’s just a laser, lower voltage will cause lower laser brightness but won’t prevent you from using it. The standard alkaline batteries with a voltage of 1.5VDC / piece provide the collimator factory voltage.
In order to be able to easily remove the batteries for charging, I used battery cradles. I thought it would be good to equip the power module with a DIP switch and a red LED, that would indicate the module’s operation. I have designed a housing that will fit all these things. The lid of the housing is sliding, so I can easily get inside to replace the batteries. The housing has a small handle in the shape of an ear through, which you can thread Velcro fastener. It will be possible to easily attach the power module to any mounting or telescope handle location, so that it does not prevent collimation process.

The photo below shows the printed models. Battery cartridge and a box with a lid.

It took me a while to figure out a way, to lead the power cables to the battery cartridge. After considering several options, I concluded that the best solution would be to drill a small hole in the laser power cap.

I threaded two wires through the drilled hole.

Let’s put it all together

I screwed the two ends of the wires to the battery cartridge. The negative from the bottom and the positive inside and locked it from the top with the screw, which is also the positive pole for the laser housing.

I have inserted the battery cartridge into the place, where the batteries would normally be. Gently pressed a screwdriver on the top of cartridge, so that the screw on the front of the cartridge had good contact, with the negative pin of the power supply. I screwed the lid, where its spring pressed against the screw washer together with positive power cable where it was connected.

Tests
Let’s check if it works. I’ve put on a 3x AAA rechargeable battery and turned on the power. The LED status flashed a beautiful red light. For a moment I watched if there would be some unwanted smell of burning electronics and searing smoke with my eyes…. Luckily, nothing like that happened. I turned on the laser and a beautiful red beam of focused light appeared on the top of my desk.
It works!